Step 3 — DO: Configure Rule Behavior
The Rule behavior panel has two tabs: Behavior (security and traffic actions) and Response (how responses are shaped going back to the browser).
Behavior Tab
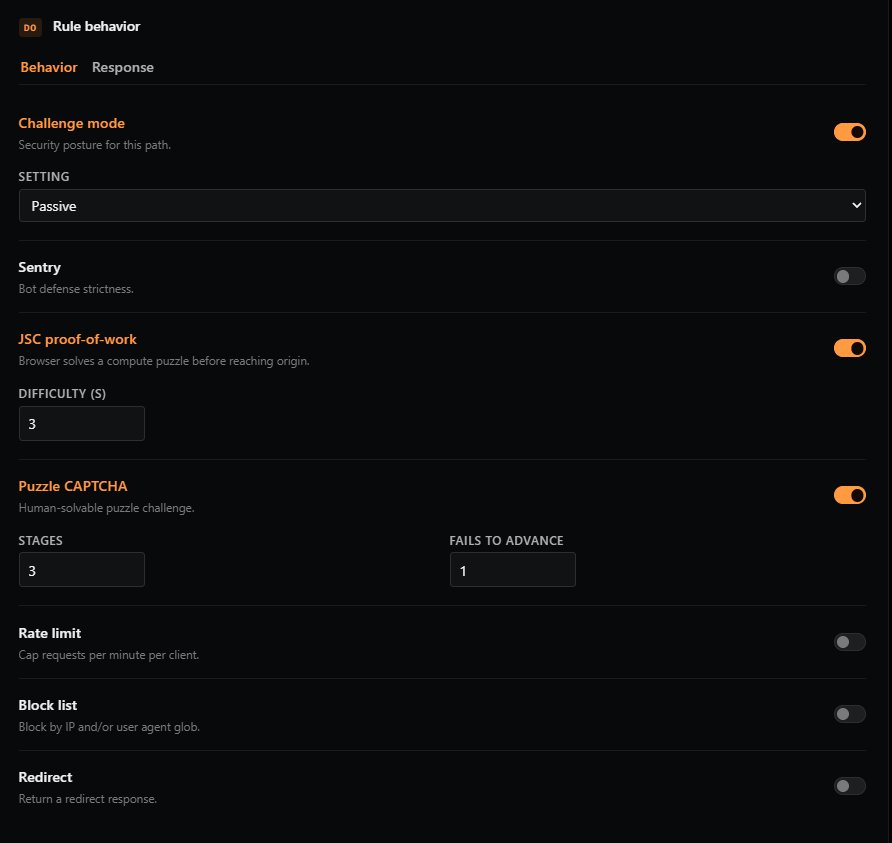
Challenge Mode
Sets the security posture for matching requests. Toggle on to enable, then choose a setting:
| Setting | Description |
|---|---|
| OFF | No challenges are applied. Not recommended for any public-facing endpoint. |
| PASSIVE | Quietly challenge known bots while allowing legitimate traffic through unimpeded. Good default for most paths. |
| STRICT | Challenge any unknown device. Suitable for sensitive paths like login or admin areas. |
| JSC | Force every request to solve a JavaScript compute challenge (proof-of-work). |
| CAPTCHA | Force every request to solve an interactive CAPTCHA puzzle. Highest friction. |
Recommended: Start with Passive for general traffic and use Strict or higher for sensitive paths.
Sentry
Configures bot defense strictness. This works alongside Challenge mode to add a layer of bot-detection scoring.
| Setting | Description |
|---|---|
| OFF | Sentry disabled. |
| Lenient | Block only the most obvious bots. Lowest false-positive risk. |
| Standard | Permit most browsers through while blocking most bots. Good general-purpose setting. |
| Hardened | Block most bots and most automated browsers (e.g., headless Chrome). |
| Lockdown | Only permit verified humans through. Highest friction. |
JSC Proof-of-Work
Requires the visitor's browser to solve a small computational puzzle before the request reaches your origin. Invisible to humans, expensive at scale for bots.
- Difficulty (s): How hard the puzzle is. Range 1–5. Recommended: 3. Higher values increase bot deterrence but also increase load time for legitimate visitors on slower devices.
Puzzle CAPTCHA
A human-solvable puzzle challenge shown when the rule decides a request needs interactive verification.
- Stages: How many puzzle stages must be solved. Higher = more friction for both humans and bots.
- Fails to advance: Difficulty scaling for incorrect answers. After this many failed attempts, the puzzle becomes harder.
Rate Limit
Caps the number of requests a single client can make to this endpoint within a time window.
- Requests per limit: The maximum number of requests allowed.
- When exceeded (choose one):
| Action | Description |
|---|---|
| Challenge | Force the configured challenge (CAPTCHA, JSC, etc.) to reset the rate limit counter. |
| Block | Reject the request outright. |
| Delay | Hold the request in a queue until the rate falls back under the limit. |
| Log only | Allow the request through but record the violation in your logs. Useful for tuning before enforcement. |
Tip: Start with Log only when introducing rate limits so you can observe real traffic patterns before enforcing.
Block List
Advanced blocking based on IP or User-Agent.
- IP/CIDR: A list of IP addresses or CIDR ranges to block (e.g.,
192.0.2.10,198.51.100.0/24). - User agents: A list of User-Agent globs to block (e.g.,
*curl*,BadBot/*). - On match (choose one):
| Action | Description |
|---|---|
| Return 403 | Immediately respond with 403 Forbidden. |
| Challenge | Force the configured challenge before allowing the request. |
| Tarpit | Deliberately slow the connection to waste the attacker's resources without giving them a clean rejection. |
| Log only | Allow the request but record the match. |
Redirect
Send matching requests to a different URL.
- Redirect to: The full URL to redirect to (e.g.,
https://www.example.com/new-path). - Status: The HTTP status code returned to the browser.
| Code | Meaning |
|---|---|
| 301 | Permanent redirect. Browsers and search engines update bookmarks and indexes. |
| 302 | Temporary redirect. The original URL is expected to come back. |
| 307 | Temporary redirect, preserving the HTTP method (e.g., a POST stays a POST). |
| 308 | Permanent redirect, preserving the HTTP method. |
Use case: Use
301for permanent moves (old → new domain),307/308when you need to preservePOSTbodies during the redirect.
Response Tab
The Response tab controls how responses are shaped on their way back from your origin to the visitor's browser.
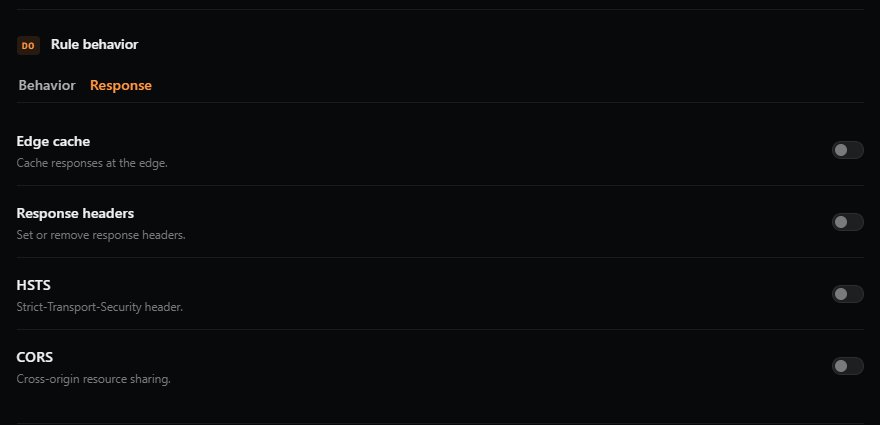
Edge Cache
⚠️ WARNING: Enabling Edge Cache will cache all responses from the origin server, regardless of what the origin's own caching headers say. Be very careful not to apply Edge Cache to authenticated pages, API responses with user-specific data, or any dynamic content. Cached responses can be served to other users.
Cache responses at GatewaySentry's edge for faster delivery.
- Preset (cache duration): Choose one of:
- None
- 30 seconds
- 1 minute
- 5 minutes
- 1 hour
- 1 day
- 1 week
- Cache key (optional): A random string used as part of the cache identifier. Changing this string invalidates all previously cached responses for this rule — useful when you've pushed an update and need cached pages to refresh.
Response Headers
Override or remove headers in the response on its way back to the browser.
- Set: Add or overwrite a header (name + value).
- Remove: Strip a specific header from the response (e.g.,
Server,X-Powered-By).
Use case: Add security headers like
X-Frame-Optionsor remove headers that leak server software details.
HSTS
Adds the Strict-Transport-Security header, telling browsers to only ever connect to your site over HTTPS.
- Include sub-domains (checkbox): Apply HSTS to every subdomain as well.
- Preload (checkbox): Mark the site as eligible for inclusion in browser HSTS preload lists.
⚠️ Important: Once a browser receives an HSTS header, it will refuse plain-HTTP connections to your site for the duration of the policy. Be especially cautious with Preload, which is very difficult to reverse.
CORS
Configure Cross-Origin Resource Sharing responses at the edge.
- Allowed origins: Comma-separated list of origins permitted to make cross-origin requests (e.g.,
https://app.example.com, https://admin.example.com). - Allow credentials (checkbox): Allow cookies and credentials to be sent on cross-origin requests.
- Allow all origins (checkbox): Allow any origin (
*). Cannot be combined with "Allow credentials" — browsers reject that combination for security reasons.
Previous: ← Step 2 — WHEN: Define Match Conditions Next: Step 4 — THEN: Decide What Happens Next →